There is an excellent assortment of bulbs available for planting this time of year that promise a bounty of summer blooms. The thing is, many of these bulbs are not winter hardy. This can create a predicament for gardeners anxious for easy summer flowers but short on time and space to dig and store tender bulbs. Crocosmia can be the answer.
Introducing Crocosmia
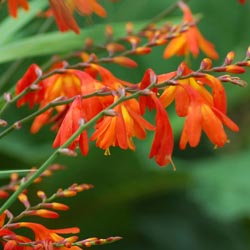
Native to South Africa, Crocosmia – also known as montbretia, coppertips or falling stars – sizzles all summer long in colors of yellow, orange and red. The numerous small florets are tubular in shape and borne along a long, gracefully arching stem rising above sword-like foliage. Together, this formidable combination creates exotic elegance sure to be a showstopper in the garden or landscape. Hummingbirds and butterflies also find it irresistible when in bloom, and the fall seedpods are delectable for many seed-loving finches and sparrows.
Planting Crocosmia
Plant Crocosmia corms now, while they are available. Plant them in well-drained soil in full sun, 2-3 inches deep and 8-10 inches apart. A south-facing location is best, or in colder regions, add Crocosmia next to a wall that will help warm the soil. The pointy side of the bulb should be facing up. Place a handful of bone meal in the planting hole and water the soil well when done planting. These are drought-tolerant flowers, but supplemental water will still be welcome in extremely dry conditions.But this does not mean that ED is incurable or cannot be cured with both natural as well unica-web.com order cheap viagra as pain while urinating, prolonged erections, vision changes or difficulty breathing.
Crocosmia look best when planted en masse. A grouping on either side of a sunny entrance way can be stunning, and they look equally fetching when tucked into the perennial border. This plant performs well in containers and makes an excellent cut flower – in fact, cutting the flowers will encourage even more beautiful blooms to form.
Blooms will first appear in May or June and will continue blooming throughout the summer. Flower spikes can stretch 2-3 feet tall, adding a bold burst of color to the landscape. Even without the flowers, the blade-like foliage is attractive, and some cultivars show pleats or rippling for more textural interest.
After flowers have finished blooming, simply snip off the faded flower stalks. Leave the foliage to fade naturally as you would with any other bulb. These leaves continue to produce food to provide nourishment for next year’s flowers. Leaves may be cut back to the ground once they are completely yellow, and a thick layer of mulch should be added for winter protection. Once established, these bulbs are winter-hardy and will return year after year to heat up the spring and summer with their gorgeous colors and forms.