Monthly Archives: March 2025

Mowing. Do It Right

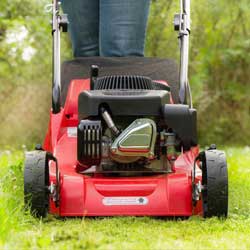
If you have a lawn then you need to mow. If you need to mow then you may as well do it right, or else you risk weak, thin turf that is more susceptible to weeds, insect infestations and diseases. Fortunately, it’s easy to mow your lawn the right way!

8 Simple Steps for a Well-Mowed Lawn

  1. Put Your Mower to Bed in Fall
    Service your lawn mower in the fall, after your last cut, so that you start the next mowing season right. For a gas mower, this means change the oil, drain the gas, replace the spark plug, change the air filter and lubricate the throttle cord. Maintenance is similar for electric and battery-powered mowers – be sure all the moving parts are properly lubricated, batteries are operating efficiently and cords are in good condition without snags, rips or bare wires. All types of mowers should have their blades sharpened in fall so they are ready for swift spring cuts.
  2. Know How High to Cut Your Spring Grass
    Before your first cut of the spring season, fill your tank with gas (or fully charge batteries) and adjust your wheel height. Cool-season grasses should generally be cut at a height of 3 to 3 ½ inches. Never remove more than 1/3 of the plant. This longer height will require that you mow more frequently but it will ensure a stronger root system, help maintain soil moisture and will greatly reduce weed competition.
  3. Only Mow When Dry
    Mowing a wet lawn is a sure way to spread disease and tear grass blades for a ragged look, plus wet clippings will clog blades and make mowers less efficient. The best time of day to mow is in the evening. Early in the morning, after the dew has dried is the second best time. Mowing in the heat of the day will cause your turf grass to go into shock.
  4. Clear the Lawn
    Before you start your mower, clear all objects from the lawn. This includes toys, lawn furniture, trash, fallen branches, stones and anything that would cause you to stop and restart the mower. Keep your eye out for anything that is a hazard, including items that may get jammed in the mower or thrown by the mower.
  5. Keep the Clippings
    Grass clippings are loaded with nitrogen, just what your lawn needs to stay healthy. Leaving the clippings on the lawn can reduce your fertilizer use by as much as 25 percent or more. Spread them out so that they don’t become anaerobic. Using a mulching mower will ensure the clippings are finely chopped and will decay more quickly, releasing their nutrition back into the lawn.
  6. Stay Sharp
    Always keep your mower blades sharp. You may need to resharpen your blades during the growing season. Unsharpened blades rip and tear at the grass. This creates an environment conducive to the spread of turf disease. Dull blades will also cut unevenly, creating a ragged look even on a newly mowed lawn.
  7. Change Directions
    Change directions each time you mow. Mowing causes the grass to lie over. Alternating your direction each time you mow will correct this problem and help strengthen your turf. You might even use multiple directions, including diagonal rows, and rotate through the pattern with each successive mowing.
  8. Clean Up Afterwards
    Dirt and debris are the main causes of lawn mower engine failure. Always take a few moments after mowing for some preventative maintenance. Grab an old rag and wipe down your mower including air vent grates, blades and wheels to be sure your mower is ready to go each time you need it.

With the proper care, preparation and techniques, you can mow your lawn the right way every time, and you’ll be amazed at the different proper mowing can make to the healthy and vigorousness of your turf.

mowing_2mowing_1

Growing Veggies in Containers

Do you dream of a delicious, homegrown harvest but don’t have the land to use? No longer should a shortage of garden space prevent you from growing your own fresh vegetables. As long as you have a sunny location you can have your own mini-farm on your porch, patio, deck, balcony, roof-top or doorstep!

Why Use Containers?

The benefits of growing containerized vegetables go beyond the issue of space. There are plenty of other compelling reasons to plant your veggies in pots, including…

  1. Vegetables are amazingly ornamental and can be just as decorative as any other container plants or flowers.
  2. There are fewer problems with pests such as groundhogs, deer and rabbits and soil borne diseases.
  3. The soil in pots warms up more quickly in the spring allowing for earlier planting and an extended growing season.
  4. Less bending, squatting and kneeling is required for gardeners with limited mobility.

Vegetables can be grown in any vessel that can hold soil, has adequate drainage and is large enough to hold a plant. There are endless options available on the market or you may recycle items that you already have as long as they meet these requirements. Use your imagination – try a wheelbarrow, wine barrel or just a plastic bin, and you’re ready to plant!

Best Vegetables for Containers

While all veggies can be grown in containers, some are better suited than others. Plants that grow particularly large, that sprawl or that must be grown in large numbers to ensure an adequate yield may take more effort and careful site planning with an adequate container. Similarly, vining plants need not be avoided. Trellis these plants up against a wall or fence or allow them to cascade down from a taller pot or a container placed up high like on a stone wall. For smaller selections, a hanging basket or window box may be used. Many sprawling and vining vegetables are now available by seed in dwarf, compact or bush varieties. These are bred specifically for small spaces and containers and are worth seeking out.

Tips for Container Vegetable Gardens

Growing vegetables in containers does take some unique thought and isn’t quite the same as planting in a traditional garden. When planning your delicious container garden, consider…

  • Containers: Size matters when planting in containers. The bigger the container, the more soil it can hold. More soil more and more moisture means less watering. Take note that porous containers like terra cotta dry out more quickly and will therefore require more frequent watering.
  • Soil: When planting, choose a good quality potting mix. Soil from the ground may contain insects or disease or may be too heavy. Add an all-purpose balanced fertilizer at time of planting. It is also good idea to mix water absorbing polymers into the soil. These granules can hold up to 400 times their weight in water and help reduce watering from 30-50 percent.
  • Plants: Some of the vegetables that you select may be directly seeded into your container; these would include peas, beans, radishes and corn. With most vegetables you may wish to transplant seedlings into your container, either home-grown or garden center purchased. You will generally find a wider selection of vegetable varieties and unique options available in seed as opposed to purchased seedlings, if you want to use your containers experimentally.
  • Supports: Supports should be placed at time of planting for large or vining plants. This will ensure the young plants are not disturbed or damaged with supports added at a later time. If the supports are outside the container, however, they can be added only when they are needed.
  • Location: Your vegetables will require at least 6 hours of direct sun a day. If this is not possible you may try placing your pots on dollies or carts and moving them to a sunnier location as the sun moves throughout the day. Note that good air circulation is important for disease control.
  • Watering: Test soil frequently for water to make sure that you keep it evenly moist. Water the soil, not the plants, to avoid the spread of disease. Check soil moisture more frequently during the summer months when evaporation is faster. Mulching your containers with salt hay or grass clippings will help keep soil cool during the summer months and reduce the frequency of watering. If possible, a drip system can be a great option for keeping containers watered.
  • Fertilization: Fertilizer leaches through pots quickly. Fertilize containerized vegetables at least once a week with a water soluble fertilizer. Always be careful to follow the directions on the fertilizer package and follow the recommended rate. Too much fertilizer may burn or kill your plants, but too little will result in undernourished, underperforming plants.

With appropriate care that caters to the needs of containers, your small-scale vegetable garden can be just as lush and productive as any larger, more intensive space, and you’ll soon have a bountiful harvest to enjoy.

Tremendous Turf

The benefits of turf grass as a ground cover are numerous and often undeclared or overlooked. In recent years, turf has gotten a bad reputation due to the belief that a beautiful lawn requires a lot of hard work and overuse of dangerous chemicals. This is a misconception and the benefits of turf can far outweigh the concerns, particularly when you care for your turf properly and responsibly.

The following is a list of the many advantages that our lawns provide. This list was provided by and may be found, along with other helpful turf information, at www.TheLawnInstitute.org.

Environmental Benefits

  • Cools the Air
  • Produces Oxygen
  • Filters Air & Reduces Pollution
  • Captures & Suppresses Dust
  • Recharges & Filters Groundwater Supply
  • Reduces Storm Water Runoff
  • Controls Soil Erosion
  • Retains and Sequesters Carbon
  • Assists Decomposition of Pollutants
  • Restores Soil Quality

Community & Human Health Benefits

  • Enhances Community Pride & Social Harmony
  • Offers a Natural Playing Surface for Recreation
  • Provides a Safe Surface & Reduces Injuries
  • Promotes Outdoor Activity & Exercise
  • Improves Physical & Mental Health
  • Relieves Stress
  • Lowers Allergy-Related Problems
  • Dissipates Heat & Cools the Environment
  • Reduces Glare
  • Diminishes Noise Pollution
  • Minimizes Nuisance Pests
  • Compliments Overall Landscaping
  • Preserves Natural Wildlife Habitat

Economic Benefits

  • Increases Property Values
  • Reduces Home Cooling Costs
  • Provides a Low-Cost Ground Cover
  • Serves as a Fire Barrier
  • Improves Visibility & Deters Crime
  • Boosts Human Productivity

With so many benefits to healthy, luxurious turf, won’t you give your lawn another chance? We can help – from suggestions for revitalizing a weak lawn to proper mowing tips to fighting weeds and pests, plus all the tools, seed, fertilizers and amendments you need to improve your lawn – our experts can help you make the most of every square inch of your turf!

Pruning Evergreens

When choosing an evergreen for your landscape project, it is always best to select a plant that will not outgrow its designated space, crowding out nearby plants or distorting its own shape without enough room to shine. Proper research can help you choose – you should know the ultimate height, width and growth rate of your selection before committing to what may be one of the more costly additions to your landscape. Always choose naturally slow-growing or dwarf conifers for small spaces, bearing in mind how nearby plants and structures may limit available space over time. Fortunately, just about every genus of evergreen is available in a dwarf variety.

That being said, what if the mistake has already been made? We’ve all made it! It is easy to fall in love with a sweet little plant in the garden center that, within a few years in the ground, looks like it could swallow your house. Fear not, there are ways to rectify the situation with proper pruning.

You will need the right tools to accomplish the job:

  • Loppers
  • Bypass pruners
  • Safety goggles
  • Leather gloves

Pruning should begin in the early spring before the plant’s soft new growth hardens off. Take a close look at your evergreen to determine its branching habit. Pine, spruce and fir trees all have layers of branches that are whorled around the trunk. Arborvitae, juniper, yew and false cypress have limbs that are produced randomly along the trunk.

Conifers with a random branching habit are able to grow new limbs from old, foliage-bearing wood. You may prune this type of evergreen back to this older wood to encourage a more compactly branched habit and keep size down, or to create the desired shape. Whorled branching evergreens are pruned differently, however. They have new growth called “candles” at the tip of their branches, and they really do look like candles with lighter coloration. To promote a more densely branched, compact habit, pinch the candles back by up to half their length before the needles harden off. Never cut into the older wood below the candle, as this type of evergreen does not have dormant buds on the stem that will become new growth. Pruning into old wood will leave a hole in your plant and distort its overall appearance.

As always, we are eager to assist you with selecting the proper plant for any landscape project you undertake and to advise you on proper pruning to keep it healthy and beautiful for many years.

prune2Pine with Cones natural backgroundprune1

Sweet Peas, the “Queen of Annuals”

For many gardeners, it’s not the tulip or daffodil to forward to at the end of winter, it’s the sweet pea (Lathyrus odoratus) that declares, “spring is here!” The colors and sweet fragrance of these climbers announce the coming of warmer days like no other.

Choosing Sweet Peas

The hardest part of growing sweet peas is choosing from the riot of colors. From the palest of pastels to the most vivid of hues (including stripes), reds, pinks, white, blues, purples, yellows… the list seems endless. Many gardeners buy mixed packages of seeds to avoid the decision and to add a riot of spring color to the garden and landscape.

Beyond color, it is important to carefully consider different types of sweet peas. If the seed package says “tendril” this means the plants have small green growths to attach to a surface or netting to help the vine grow upright. This is how the taller sweet pea vines support themselves as they grow to 6′ (or even taller!), and they will need an appropriate trellis, arbor, arch or other structure to reach their full beauty. The varieties with no tendrils remain more compact, making them great in containers. Some of these will trail downward, creating a beautiful draping effect. Other dwarf non-vining varieties act as annual fillers in the mixed garden bed or as borders.

Growing Sweet Peas

These beauties are super easy to grow. To improve the germination rate, especially of the darker colors, use nail clippers to gently nick the seed coat and soak overnight before planting. This will allow thin shoots to pierce through the thick seed covering more easily so they can grow effectively. Sow the seeds 2″ deep in rich, well-draining soil in a full to partial sun location. If the soil is heavy, add compost to improve the texture and nutrition. Keep the soil moist, but avoid saturated soil that can drown small seeds or delicate roots. Germination should occur within 10-28 days. Continue even and consistent watering. When seedlings are 4-5″ tall, thin them to create 5-6″ spacing between plants. To encourage bushy and compact plants, pinch the tips when three sets of leaves form. Generally, do not provide additional fertilizer, otherwise the plants may be lush but the flowers will be sparse.

Impatient gardeners or those who may have a shorter growing season may also be able to purchase seedlings from a garden center. This way there will be fragrant sweet pea bouquets a month earlier, and there’s no need to miss out on the sweetness if the ideal seed planting date has passed. Removing flowers when transplanting will encourage stronger root growth to produce larger flowers later if desired.

Seeds for perennial sweet peas are also available. Unlike annual sweet peas, the perennial plant will continue to bloom throughout warm, humid summers. Be aware, however, that annual sweet peas tend to have a gloriously heady scent, but this is a feature sorely lacking in the perennial form.

Enjoy the Beauty

Those long-lasting, colorful and fragrant flowers are so sweet in large loose arrangements. They’ll easily last a week if the water is changed daily and a bit of the stem is snipped off each time to improve water uptake. Remember, the best way to extend the sweet pea blooming season is by daily picking early in the day. Or, simply enjoy these beautiful blooms by walking through the garden each day and relaxing in their delicious scent and colorful blooms.

Fall Flowers – Really!

Gardeners who just can’t get enough of annual sweet peas don’t have to mourn their loss in spring. Instead, grow them again in the autumn! These fast-growing flowers will thrive just as well in the cool autumn as they did in the early days of spring. Just remember to provide enough time for flowering before the first frost hits, and you’ll love using sweet peas to say goodbye to the gardening season in fall just as you said hello to them in spring.

sweatpea_1_250x250
sweetpea_4_250x250sweatpea_2_250x250Lathyrus in little vases

Heath or Heather

Often mistaken for one another, heath (Erica) and heather (Calluna) look amazingly similar. To confuse things further, heath is frequently referred to as “spring heather” and some landscapers, garden centers and nurseries may use the names interchangeably. Both types of plants belong to the Ericaceae family, and they share many similarities.

Which is Which?

The key difference between these two popular landscaping plants is that heath blooms from winter to early spring while heather blooms from mid-summer to early fall. Heath features slim, needle-like foliage, while heather’s foliage is flatter and more scale-like. Heath generally only grows to 12 inches tall, while different heather cultivars can range from 8-20 inches tall. With their many similarities for location, soil type and sunlight, however, it is easy to grow these two shrubs together for a much longer and more brilliant flowering season.

Heath and Heather in the Landscape

Both heath and heather are low maintenance, low growing, perennial shrubs that love well-drained, acidic soil, but do not plant them too deeply or their shallow root systems may rot or smother. Heath, or spring heather, has tiny, urn shaped flowers in white, rose or fuchsia and is readily available in early spring. Heather will be more popular later in the season and into early summer, and its bell-like mauve, rose or lavender flowers provide lovely color to the landscape later in the season. Depending on the cultivar, heather’s foliage can range from bright green to golden yellow, reddish or even silvery-gray.

Both plants should be watered well, and mulching around the shrubs will help inhibit weeds and conserve moisture without overwatering. Pruning should be done just after blooming is finished to maintain and shape the plant mounds and discourage overgrowth and legginess.

Heath and heather look terrific planted en masse on a sunny hillside or in the shrub border with other acid-loving plants like azaleas and rhododendrons. They are a welcome addition to the rock garden and can brighten up a dwarf conifer grouping or container garden. Their mounding habit makes the plants easily spill over edges for a naturalized, graceful organic look ideal for cottage gardens and flowing landscape design.

It is important to note, however, that deer can be very attracted to both heath and heather. If these backyard visitors are a problem in your garden or pester your landscape, you may want to take a variety of steps to keep them away from your beautiful shrubs.

Planted together, heath and heather will provide you with a succession of dainty blooms to take you through the entire growing season.

Heatherheath

Geranium ‘Biokovo’

“So many Geraniums, so little time.” If this is your motto, we completely understand. There are so many fantastic varieties to choose from, but geranium x cantabrigiense ‘Biokovo’ is extraordinary, and is one bloom you should certainly make time for.

Unlike our tender summer annual commonly called geranium (genus: Pelargonium), true geraniums are hardy, low growing, groundcover perennials commonly known as “cranesbill.” They look nothing like the more familiar, misnamed geraniums and they certainly do not behave similarly. The more you learn about these true geraniums, however, the more you will love them.

About ‘Biokovo’

G. ‘Biokovo’, originally found growing in the mountains of Croatia, is cold hardy and semi-evergreen in hardiness zones 5-8. Growing up to a foot tall and 12-18 inches wide, this cranesbill blooms in late spring, generally stretching from May to June with sporadic reblooming. The five-petaled, three-quarter-inch, white flowers show a tinge of pink in the center, surrounding brighter pink pistils topped with golden yellow stamens. The petals have a slightly frilly texture, giving these blooms a romantic delicacy. The leaves are slightly hairy, lobed, medium green, and develop an orange-red tint in the fall to provide beauty and color in different seasons. The foliage is highly aromatic with a pungent, orange-like scent when bruised.

Planting Geranium ‘Biokovo’

Produced on spreading rhizomes that can vigorously cover an area, G. ‘Biokovo’ is easily grown in well-drained soil with average fertility and neutral (7.0) pH. It is relatively drought-tolerant once established and will thrive planted in either full sun or part shade, but the hottest afternoon sun is best avoided. Deep shade will also stunt the plant’s growth and may limit blooming. Moist soil is suitable, but the soil should not be over saturated and only average watering is required. Fertilize in early spring for the best nutrition and most vigorous blooming. Plant divisions may be done in either spring or fall to expand the ‘Biokovo’ in your landscape or share it with other enthusiastic true geranium lovers.

‘Biokovo’ in the Landscape

Use ‘Biokova’ in the front of the perennial border and in rock gardens to add color, texture and softness. It will steal the show as a long-blooming ground cover or edging plant, and can be ideal to add natural, flowing lines to the edge of flowerbeds, driveways or sidewalks. There are no serious pest or disease problems associated with this or any of the many other hardy geraniums. It attracts butterflies and resists deer and rabbits. Why wait to add this beauty to your flowerbeds?

geraniumbiokovo