Monthly Archives: April 2017

Tulips: Spring Starts Now!

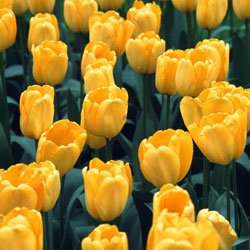
Members of the lily family, tulips are native to central and western Asia. In the 16th century, they were introduced to the Netherlands where most tulip bulbs are grown today. With over 100 species and nearly 3,000 varieties, tulips have been divided into 14 groups, including Darwin hybrids, Triumph, Lily-flowering, Double early, Rembrandt, Scheepers’ Hybrids (or French) and Parrot variations. Their classification is based on form and habit. A 15th group includes species tulips with the smallest plants growing to just 3 inches.

Tips for Planting Tulips

Tulips are an easy care addition to any landscape, and they are easier to plant than many gardeners realize.

  1. Choose only top-sized bulbs without any bruises or obvious damage. Bigger bulbs generally indicate better quality and bigger flowers.
  2. Plant bulbs as soon as purchased or store in a cool, dry location.
  3. Choose a sunny (or part sun) location with well-drained, rich soil.
  4. Plant 2” deeper than recommended to promote re-blooming each year.
  5. Apply bone meal 3 times a year – in fall when you plant, in spring as bulbs emerge from the ground and after flowering has finished. This will provide food for the foliage and bulb growth for next year’s flowers.
  6. Protect tulip bulbs from pest damage by laying wire mesh on top of your bed just beneath the soil. Sprinkling VoleBlok in the holes when planting can also be helpful.
  7. Mulch and water the bed thoroughly after planting.
  8. Plant before the ground freezes.
  9. Deadhead flowers after they have faded, but leave the foliage to die back naturally. Do not cut off the leaves until they have turned brown, or else they will not develop large enough bulbs for a good show the next year.

Tulip Timesaving Tip

Don’t have much time to plant a large, luxurious tulip bed? Plant 100 tulips in just 1 hour!

  1. Choose a part to full sun location and dig a hole 6’ x 6’ to a depth of 6-8”, placing the displaced soil on plywood or cardboard.
  2. Place 100 tulips, pointed end up, evenly over the area.
  3. Gently slide the soil from the plywood or cardboard onto the tulip bulbs. Tamp the soil lightly, sprinkle the bed with bone meal and water well. In spring, the entire area will bloom!

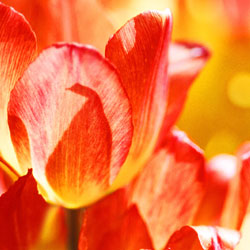
Tried & True Tulip Selections

Some tulips can be finicky, and while some tulips will disappear from your garden after a year or two, these selections promise trouble-free blooms for years!

  • ‘Daydream’ – Darwin tulip, changing colors while in bloom to vibrant apricot-orange, blooms mid-April into May, Ht: 22”. Fragrant.
  • ‘Lilac Wonder’ – Species tulip, large rose-lilac flowers with yellow bases and anthers, blooms May, Ht: 7”. Prefers full sun.
  • T. praestans ‘Fusilier’ – Multi-flowering species tulip, orange-scarlet flowers, blooms April, Ht: 8-12”.
  • T. clusiana var. chrysantha – Species tulip, good naturalizing tetraploid, deep yellow flushed with rose toward the edges, blooms April, Ht: 8”.
  • ‘Pink Impression’ – Darwin tulip, huge flower with strong, clear pink flowers, blooms mid-April to May, Ht: 22”.
  • ‘Menton’ – Scheepers’ hybrid, blooms are shades of apricot, rose, pink and peach, late-blooming, Ht: 26”.
  • ‘Mrs. John T. Scheepers’ – Huge Scheepers’ hybrid, golden-yellow tetraploid is a three-time award winner, late-blooming, Ht: 26”.
  • ‘Persian Pearl’ – Species tulip, deep magenta-rose with buttercup yellow star on the inside, blooms April, Ht: 6”.
  • ‘Maureen’ – Scheepers’ offspring, large, oval-shaped flowers of glistening white, blooms late-May, Ht: 28”. Four-time award winner!
  • ‘La Courtine’ – A Scheepers hybrid, yellow flowers are oval-shaped, flamed with red from the bottom up, late-blooming, Ht: 26”.

With so many to choose from, it’s always time for tulips!

tulip-2tulip-3tulip-1

Bringing Your Tropical Plants Indoors for the Winter

As the summer comes to an end and autumn approaches, the days get shorter and cooler temperatures signal the time to ready your plants for winter. How can you protect your treasured tropicals from winter damage?

Overwintering Tropical Plants

Don’t wait until frost warnings or freezes occur to bring tropical plants inside, especially since these plants are more susceptible to dropping temperatures. Try to have all of your plants acclimated to the new indoor environment by the end of October. Avoid the temptation to move your tropicals back outside if it suddenly gets warm, because they will have to re-acclimate when you bring them back inside again. With a little extra care even exotic hibiscus can be over-wintered inside the house.

First, it’s a good idea to prune approximately one-eighth to one-fourth off the total height of the plant’s foliage. This helps reduce the shock that the plant receives with the change of conditions when bringing them indoors. Check the plants for signs of insects and treat them with insecticidal soap or pyrethrin spray as well as a systemic insecticide that will provide protection for up to six weeks.

Position indoor tropical plants in a very bright location that receives no less than 6 hours of light per day. If the winter is very cloudy, supplement your plants with an artificial light source. Be sure the room is warm, but avoid putting the plants too close to a heating vent, which can dry them out drastically.

Because they are tropical plants, they will need good humidity which can be achieved by using a humidity tray. Use a saucer that is at least 3-4 inches larger than the pot and fill it with an inch of stones. Pour water over the stones until they are half covered, then place the pot on top of the stones. The humidity immediately around the plant will be increased, but avoid setting the pot directly in any water, which can lead to fungus and rotting. Grouping several plants close together can also help them preserve humidity for more luxuriant growth.

Fertilizing should be continued throughout the winter, but at a rate of once per week. You will find the plant will not utilize as much water in the winter because its growth has slowed. Generally, plants should be watered every 4-7 days depending on location, pot size, soil type and plant type.

If you have any questions about winter care of your plants, our staff will be glad to help you keep your tropicals in good condition all winter long.

tropical-2

tropical-1

Problems With Your Compost Pile? Fix Them!

A compost pile should be part of every gardener’s yard, since it adds so many benefits for recycling and providing organic material in the garden. There are times, however, when it can be tricky to keep a compost pile in peak condition and breaking down material most efficiently. If you encounter any of these common problems, you can easily correct them and keep your compost pile at its best.

  • Pile is Too Dry
    Without adequate moisture, beneficial microorganisms cease to function and decomposition stops, turning a compost pile into a clumpy mess that does not decay into usable organic material. Keep the pile moist at all times, but not overly wet. A dampness like a squeezed sponge is ideal. It may be necessary to use a hose to water your pile occasionally, or a tarp or piece of plastic over the top of the pile can help keep moisture in the pile instead of evaporating.
  • Foul Odor
    A stinky compost pile is no gardener’s friend, and over-watering the pile will compact the material. When air space is decreased, the pile becomes anaerobic, resulting in an unpleasant odor. Turn the pile frequently to increase aeration and add larger pieces of dry, porous, carbon-rich material such as wood chips or straw to absorb excess water and improve air circulation.
  • Pile is Cool
    Check all the items required for a hot, quickly-decomposing pile: carbon, nitrogen, air and water. Correct any deficiencies. Another issue may be that a pile that is too small will have difficulty insulating itself. Increase the size of your compost pile by adding more material so it can generate sufficient heat from decomposition to keep itself warm.
  • Pests in the Pile
    While insects and worms are welcome helpers in a compost pile, a poor pile may also be attracting mice, rats, squirrels, raccoons and other wildlife. This usually means that the wrong material was used for composting. Never add meat, fish, bones, dairy products or oily food to the compost pile, all of which can have strong odors that will attract unwanted wildlife. Similarly, no human, cat or dog manure should be added to the pile. Avoid adding weed plants or diseased plants as well, since those weed seeds or disease spores could be transmitted to your garden or landscape when the compost is spread.
  • Poor C/N Ratio
    When planning the optimum conditions for compost decomposition, the standard recommendation is 3-to-1; three parts carbon to one part nitrogen. Carbon-based material is brown and nitrogen-based material is usually, but not always, green. Chopping or shredding additions to the compost pile will speed up the decomposition and help keep the pile balanced.

    The best materials to add to your compost pile include…

    Brown Material (Carbon-Based)
    – Dried, dead Leaves
    – Shredded paper, including newspaper
    – Wood ash
    – Sawdust
    – Eggshells
    – Chipped brush and wood chips
    – Straw and twigs

    Green Material (Nitrogen)
    – Grass clippings and sod scraps
    – Vegetable and fruit peels, scraps and rinds
    – Disease and insect-free plant material, such as clippings and prunings
    – Horse, cow, chicken and rabbit manure (herbivores)
    – Coffee grounds and used coffee filters
    – Used tea bags
    – Used potting soil

No matter what issues your compost pile may be having, problems are easy to correct and you can quickly adjust your pile to be productive and efficient. Before you know it, you’ll have plenty of rich, nutritious compost to nurture your garden and landscape all year long.

compost-1

compost-3

compost-2

Get Started Composting

Fall is an excellent time to start a compost pile with all of the leaves falling, and if you develop compost now, you will have a rich source of organic material for your garden and flowerbeds in spring. Getting started with compost is fairly simple if you keep in mind the following…

  • Size Matters
    Smaller particles break down faster than larger chunks. Shredding or mulching garden wastes will help speed up the process and develop usable compost faster. Chop up larger pieces of household materials before adding them to your compost pile to speed up their decomposition.
  • Take a Turn for the Better
    Turning helps aerate the pile and shifts outer parts closer to the center where they can heat and decompose more effectively. A well-mixed pile will also have better consistency and more evenly distributed nutrients. Use a pitchfork, spade or rake to gently turn your pile periodically, such as once every 1-2 weeks or whenever you add a large amount of new material to the pile.
  • Know What to Compost
    Materials that can be composted are sod, grass clippings, leaves, hay, straw, manure, chopped corncobs, corn stalks, sawdust, shredded newspaper, wood ashes, hedge clippings and many kinds of plant refuse from the garden. Some household waste, such as coffee grounds, banana peels, eggshells and vegetable peelings are also ideal for a compost pile and will reduce the trash you accumulate.
  • Avoid Unwanted Materials
    Materials to avoid composting are large amounts of weeds, grease, fat, meat scraps and bones, cheese, coal ashes, diseased plants, cut weeds and charcoal. These materials do not decompose readily and can create poor quality compost. For example, meat, grease or dairy products in your compost will begin to smell strongly, which could attract rats, raccoons or other unwanted visitors. Diseased plants or weeds can survive in a compost pile, contaminating your garden when you add the compost to the soil in spring.
  • Cover as Needed
    Covering your compost pile with a tarp or large piece of carpet can help preserve the heat and moisture essential to promote appropriate decomposition. The cover can also keep the pile from freezing or getting too wet in winter conditions, and it can easily be removed to add new material or turn the pile as needed.

Before you toss out your next bag of trash, check for compost material and start your pile today! Your garden will thank you tomorrow.

compost_2

compost_1

Gardener Holding Tree Bark Mulch

Over-Wintering Container Plants Outdoors

All containerized plants that are considered hardy in your zone can spend the winter outdoors, but you do need to take a little special care to keep them safe and comfortable as temperatures drop. Despite their hardiness, winter is still a challenging season, but it is possible to keep your container plants healthy until the days grow longer and warmer again.

Options to Overwinter Your Container Plants

  • In the late summer or fall, removed the plant from its container and plant it in the ground while the soil is still warm. Another method is to bury the pot, with the plant in it, in the garden and remove the pot following spring. Both of these methods will help insulate the root system, preventing it from freezing solid and killing the root system.
  • Place containerized plants in an unheated garage but along a heated wall. This is an excellent method for very large pots or porous pots that tend to break apart from the constant cycle of freezing and thawing, and so would not be very hardy if buried. For extra root protection and insulation, wrap the pots in plastic bubble wrap or wrap an old comforter or quilt around the pots.
  • Group pots together along the sunny side of your house or shed. If this area is windy, create a windscreen with stakes and burlap. Place bales of straw or hay around the perimeter of the grouping up against the pots to further protect plants from cold winds. Fill in areas between pots with mulch, shredded leaves, grass clippings or hay for insulation. Lay evergreen branches or place a layer of mulch on top of the pots for additional protection.
  • Use a cold frame covered with plastic or Reemay fabric to help control temperatures and reduce light as well, helping plants stay dormant in winter. It will still be necessary to use mulch, shredded leaves or hay around and in-between pots for insulation. Rodent control, such as Havahart traps, may be necessary when using this method.

Watering Container Plants in Winter

Make sure that plants go into the winter with moist soil so that there is water available to plant roots. Check soil moisture occasionally, never allowing it to dry completely. It is also a very good idea to spray needled and broadleaf evergreens with an anti-desiccant. This acts as a protective coating for plant foliage and stems as it helps them retain moisture.

With just a little care and forethought, you can easily prepare containers for winter without risking the plants and arrangements you have so carefully cultivated.

over-winter-2
over-winter-1

Devil’s Darning Needle

Fall is here and after hiding inside in the cool comfort of our air conditioning through the hottest, driest, buggiest time of the year, our interest in revisiting the outdoors is renewed. Reemerging from self-imposed exile into the garden, it is pure joy and a relief to witness the tenacity of late season bloomers that have had to bear, with no assistance or relief, the dog days of summer. One such plant, reliable and prolific, is Clematis virginiana, better known as Devil’s Darning Needle.

Devil’s Darning Needle – also called Devil’s Hair, Love Vine and Woodbine – is a North American native vine. It is very similar in habit and appearance to the Japanese native, Sweet Autumn Clematis (C. terniflora) that most of us are familiar with, yet Devil’s Darning Needle is not as aggressive and can be better controlled in the landscape. C. virginiana is a vigorous, twining, deciduous vine, growing about 15 feet in a season. This plant is in best form when planted next to a supporting structure such as an arbor, trellis, fence, tree or shrub. Its quick growth rate makes this an excellent choice where quick privacy is needed, such as along a fence, shielding a patio or forming a wall around a deck. If unsupported, it will sprawl along the ground.

What makes this plant so alluring is its annual, overwhelming display of 1 and 1/4 inch, highly fragrant, star-shaped, pure white blossoms produced in billowy masses in the fall followed by ornamental, silvery, plume-like seed heads. Both flowers and seed heads work well in floral arrangements. Either in the yard or in a vase, this prolific bloomer will not disappoint.

Devil’s Darning Needle is easy to grow. As a low-maintenance vine, it is rarely troubled by pests or disease. It performs well in moist to wet soil of average fertility and prefers full sun to part shade, although it will thrive and bloom in considerable shade. Supplemental watering may be necessary during times of drought. In late winter or early spring, prune C. virginiana back hard to about one foot from the ground to encourage spring growth, but be certain to leave at least two strong buds on each stem. During the growing season, monitor the vine if it is growing through a shrub to make certain that the shrub is not being overwhelmed. No special care is needed to trim it back to control size, but it can be pruned for shape if desired.

Devil’s Darning Needle can be an amazing addition to your landscape, and its late summer and early fall beauty is sure to delight just when other plants begin to fade.

clematis_250x250_2clematis_250x250_1

Fall-Blooming Camellias

We love camellias! An Asian native and an old southern standby, they are now a favorite in the northern states as well. In recent years, new varieties have been developed for their increased cold hardiness, giving northern gardeners even more opportunities to enjoy these charming beauties. Blooming in October, November and even into early December, fall-blooming camellias provide an abundance of colorful showy blooms that can now be enjoyed in colder climates.

Camellias do best in rich, moist, well-drained, acidic (5.5-6.5 pH) soil. Plant camellias in a location where they will be protected from the drying winter sun and wind or else the delicate blooms may suffer. Because these shrubs are shallow-rooted, they should be planted no deeper than they are planted in the pot that you purchase them in. Apply 3-4 inches of mulch to the root zone to keep soil moist and control weeds. Compost added to the soil can also help provide suitable nutrition to keep these plants healthy. Water camellias first when newly planted and frequently during times of low rainfall – a drip system can be a great option to keep these shrubs suitably moist. Fertilize in the spring with a fertilizer specified for acid-loving plants. If purchasing and planting camellias in the fall, be sure to give them a little extra TLC to help them through their first couple of winters and they will reward you with their beauty for years to come.

To help you choose the most beautiful fall-blooming camellias for your landscape, consider these attractive cultivar options!

  • Ashton’s Pride: Lavender-pink, single flowers with yellow centers
  • Ashton’s Snow: Creamy white flowers in semi-double blooms
  • Long Island Pink: Single blooms with bright pink colors and ruffled petals
  • Mason Farm: Pink, single flowers with a white tinge
  • Northern Exposure: Pink buds that open to single white, papery flowers
  • Winter’s Darling: Deep pink flowers with anemone shapes
  • Winter’s Fancy: Deep rich pink, semi-double blooms
  • Winter’s Interlude: Light pink blooms with anemone shapes and peachy centers
  • Winter’s Joy: Bright bold pink, semi-double blooms
  • Winter’s Star: Single lavender-pink pale blooms with yellow centers
  • Winter’s Water Lily: Elegant white flowers with a formal double shape

No matter which fall-blooming camellia you choose, if you give it the proper care, it will love you right back with abundant growth and stunning blooms that bring an air of southern charm and hospitality to your yard.

camellia_250x250_3camellia_250x250_1

camellia_250x250_2

Minor Bulbs: Perfect Partners for Early Spring Color

A garden stroll in the early spring offers a great deal of promise but generally little color. You can rectify this with a little planning and planting this fall to ensure bright spring blooms to enjoy.

What Is a “Minor” Bulb?

Often passed over at the garden center for showy, larger-flowering bulbs, minor spring bulbs give the garden a head start on spring, extending the season by blooming as early as February and March. These beautifully blossomed seasonal gems are short in stature and produce daintier flowers but, when planted en masse, make as powerful a statement as any daffodil, tulip or hyacinth planting.

Chionodoxa, Muscari, Eranthis, Galanthus and other minor bulbs are planted at the same time as tulips, daffodils and hyacinths, and in the same way, although not so deeply. The general rule of thumb is to plant bulbs three times as deep as the bulb is high. Your soil should be well drained so the bulbs do not rot. Don’t forget to include bone meal in the planting hole for strong growth in the spring.

Minor bulbs make perfect partners for all of your other traditional spring-flowering bulbs. Their size makes them suitable for rock gardens and walkways, as well as filling in spaces between other spring bloomers. They also naturalize well and will help fill in any gaps in a spring garden or wildflower lawn.

Top Minor Bulbs

There are many lovely bulbs with smaller, stunning spring flowers to choose from. Some of the most popular and versatile options include…

  • Chionodoxa (Glory of the Snow): Small, 1 inch white-centered blue or pink flowers appear on leafless stems. Plant in large groups in front of early blooming shrubs or naturalize in the lawn. When grown in shade, blooms last several weeks. Plants grow 4-10 inches tall.
  • Muscari (Grape Hyacinths): Offering the rare and cherished blue color in the garden, Muscari have small spherical blossoms bunched into triangular clusters on top of delicate 6-9 inch stems. Grape hyacinths are available in various shades of blue, purple and white.
  • Eranthis (Winter Aconite): A relative to the buttercup, Eranthis unfolds bright yellow, honey-scented blossoms that can carpet the chilly ground and bring life to a dormant rock garden. Plants grow 2-4 inches tall.
  • Galanthus (Snowdrops): The cold is no deterrent to the bell-shaped frosty white flowers of Galanthus. This plant thrives in light shade under leafless trees and is well suited to random planting amidst tough grass. Shorter varieties grow to 4 inches while giant snowdrops reach 10 inches.
  • Leucojum (Giant Snowflake): Drooping bells of white or pink flowers with green tips adorn this frost-hardy 4 inch plant.
  • Pushkinia (Striped Squill): The white flowers of this plant look light blue because of the blue stripes on the petals. Plant in sun or partial shade in well-drained soil. Striped Squill grows 6-8 inches tall.
  • Scilla (Spanish Squill): This late spring-flowering plant has multiple stems with up to 12 bells on each stem. Colors are blue, pink and white. Scilla needs adequate moisture in the flowering season as it grows to 10-12″ in height. Plant in full sun or partial shade.
  • Frittilaria meleagris (Checkered Lily): This small Frittilaria grows to only 9 inches tall compared to its sibling Frittilaria imperalis (Crown Imperial) that grows to a height of 3 feet. The checkered lily’s name is derived from its checker-patterned petals.

Any of these smaller, less obtrusive bulbs can make a great early spring statement in your garden or landscape, bringing it to life long before most spring blooms are at their peak.

snowdrop_250x250

checkeredlily_250x250_3

hyacinth_250x250

Kale, the Super Food

Did you know kale is a super food? Kale belongs to the same family as cabbage, broccoli and Brussels sprouts. It is a rich source of vitamins C, A, & B6, and is loaded with manganese, calcium, copper and potassium, with no fat or cholesterol. Add it to your garden for a healthy harvest!

Planting

In the fall, set out transplants or sow kale seeds about 6-8 weeks before first frost in deep rich soil. Kale will need at least 6 hours of sun per day. Enrich your planting soil with plenty of compost. Planting kale in nutritious soil will promote faster plant growth and thus provide a tender, richer crop. Soil pH should be between 6.5 and 6.8. Sow seeds roughly one-half inch deep and thin seedlings to 8-12 inches apart to provide adequate air circulation. When thinning kale shoots, however, bear in mind that larger spacing will produce larger plants, larger plants produce larger leaves and larger leaves are generally tougher. Keep soil moist and mulch to control weeds. Water when planting and during dry spells.

Harvesting

Don’t worry about frost harming your harvest, a light frost will only enhance the sweetness of kale. Harvest the outer leaves of kale as they are needed for salads and recipes. Young tender leaves will grow from the center of the plant. Use the young leaves for salads and keep older leaves for cooking, which will help tenderize those larger leaves. Kale will continue to produce throughout fall in the warmer sections of our area. In low lying areas or where it is colder, use floating row covers or low tunnels to extend the life of your kale. Kale will bolt (elongate) and flower in the spring. This signifies the end, and it is time to pull it up and compost the remaining plant.

Cooking

Kale may be used fresh or frozen. It may be steamed or stir-fried, or used in soups, stews, omelets and casseroles. It is a tasty base for salads or can be added to sandwiches. It may be used in recipes as a replacement for spinach and collard greens. It even makes fantastic chips!

Kale Chips

  • Preheat oven to 425 degrees Fahrenheit.
  • Clean Kale and spin dry. Remove all the tough stems.
  • Drizzle about 8 cups of leaves with one tablespoon of olive oil and toss to coat.
  • Place Kale leaves in a single layer on a parchment lined cookie sheet.
  • Bake for 10-15 minutes or until leaves are crisp but not scorched.
  • Remove from oven and immediately sprinkle with generous amount of flaky sea salt.
  • Devour!

With so many tasty options for kale and so many nutritional benefits from this super food, there’s no excuse not to add this easy-to-grow dietary wonder to your garden!

kale_close_250x250

kale_250x250

Fairy Garden Magic

Do you think your tiny balcony terrace means you can’t have a grand garden? Are you looking for a clever and imaginative way to introduce a child to the world of plants? Have you ever dreamed of your own “McGregor’s Garden?” One of the newest gardening trends can do all these and a whole lot more!

Start planning…and playing…in your fairy garden!

About Fairy Gardens

One of the newest gardening trends, fairy gardening is the new-and-improved miniature gardening of yesteryear with all sorts of new products, idea books and plants. Despite their small size, the themes, designs and creativity of these tiny garden spaces is boundless. Any container, nearly any type of plant and any type of design can add a bit of garden magic even to a tiny space. Go small and have fun.

Designing a Fairy Garden

You can create your fairy garden just about anywhere. For portability, consider a pot, basin or terrarium. Or, for a more rustic appeal, plant an old lunchbox, garden bucket or child’s wagon. Old shoes, a stack of broken pots, a rusty wheelbarrow or a concrete bird bath are other great planting options.

Fairy gardens can be positioned anywhere. A smaller design can be a fun centerpiece to patio furniture, or it can be part of an entryway display. To heighten the intrigue, find a secret place in your own garden to lure the garden fairies. Between tree roots, beside a water feature or in a grove under flowering shrubs… The possibilities are endless.

Design the overall look of your fairy garden just as you would a larger garden. What is its theme? Is it a fantasyland for unicorns? A gnome family farm? A replica of your own big house? It can be anything you imagine. Consider tiers, layers and depth as well to create a truly impactful scene in your miniature fairy world.

If you’re having trouble coming up with an idea, visit your garden center to check out all the products. If you need some inspiration, our Enchanted Garden products by Grassland Road will get you started. Whimsical and charming, they’ll help you create your own mini-fantasy scene. From arbors and benches to umbrellas and miniature tools, the possibilities are amazing. If you’re not sure your resident garden fairies will understand your invitation, you can always buy a mannequin fairy to entice them to share the fun.

This visit also sets the mind whirling with ideas for plant materials. Consider the mixture of colors, textures, shapes, and scents… in miniature. Tiny groundcovers such as moss or creeping thyme create beautiful “lawns.” Pebbles become paths. Sand creates shores. Twigs make houses, fences and other structures. What can you do with a small pinecone or acorn? How can you recreate a Disney-type pumpkin carriage?

Creativity knows no limits, and the fairies will love you for it!

minigarden_250x250_3

gomegarden_250x250

minigarden_250x250